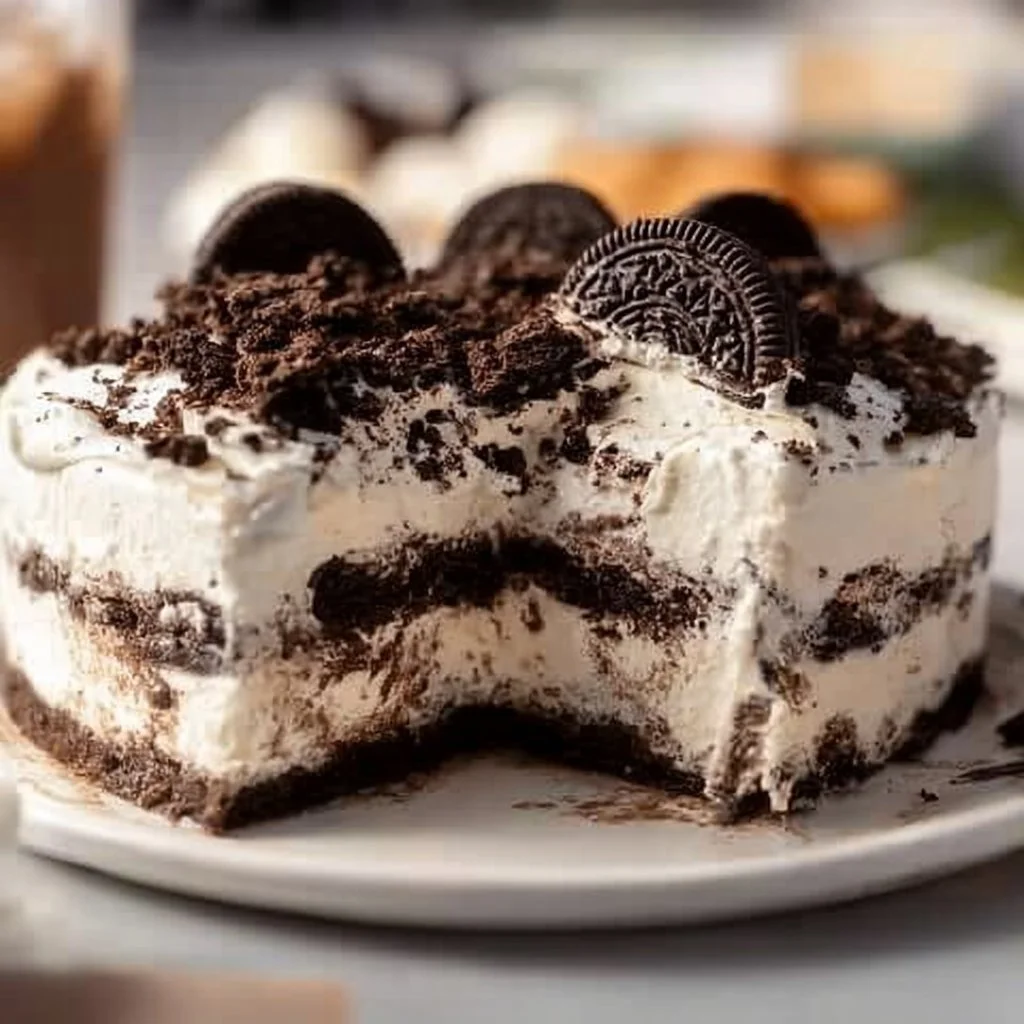
No-Bake Oreo Ice Cream Cake
Why Make This Recipe
No-Bake Oreo Ice Cream Cake is a fantastic dessert choice for several reasons. First, it is simple to prepare without using any oven, making it ideal for warm days or gatherings where you want to keep the heat out of the kitchen. This dessert combines the rich flavors of Oreos and cookies and cream ice cream, topped off with warm fudge sauce and a smooth whipped topping. It’s a treat that appeals to both children and adults alike, making it perfect for birthday parties, family get-togethers, or simply a delightful indulgence on a sunny day.
Another reason to love this recipe is its versatility. You can adjust the ingredients to suit your taste or dietary preferences. If you’re a fan of chocolate, you can add more fudge or even layer in additional chocolate cookies. If you prefer a lighter touch, use a lighter whipped topping or a different flavor of ice cream. The cake comes together easily and can be made ahead of time, allowing you to enjoy more time with friends and family.
Lastly, how can you resist a dessert that requires minimal preparation yet delivers maximum flavor and satisfaction? It brings joy to any gathering and is sure to become a favorite among your family and friends.
How to Make No-Bake Oreo Ice Cream Cake
Making No-Bake Oreo Ice Cream Cake is straightforward and does not require any complicated techniques. Let’s break down the steps involved in creating this delicious dessert.
Ingredients
Before you get started, gather all the ingredients needed for the No-Bake Oreo Ice Cream Cake:
- 1 package Oreos – crushed (reserve ½ cup for topping)
- ¼ cup unsalted butter – melted
- ½ gallon cookies and cream ice cream – softened
- 1 (16 oz) jar hot fudge sauce – warmed
- 1 (8 oz) carton whipped topping – thawed
Directions
Now, let’s dive into the easy-to-follow steps to make your No-Bake Oreo Ice Cream Cake:
-
Prepare the Oreo Crust: Take the package of Oreos and crush them into fine crumbs. You can use a food processor or place them in a zip-top bag and crush them with a rolling pin. Once crushed, reserve ½ cup of these crumbs for later. Mix the remaining Oreo crumbs with ¼ cup of melted butter until well combined.
-
Press into the Pan: Take a greased 9×13-inch baking pan and press the Oreo mixture firmly into the bottom. Make sure it’s packed tightly to form a stable crust for the ice cream layer.
-
Spread the Ice Cream: Once the crust is ready, take the softened cookies and cream ice cream. Spread it evenly over the Oreo crust. Make sure it fills in all the corners and sides of the pan.
-
Freeze: Place the pan in the freezer and allow the ice cream to set for about 2 hours. You want it firm enough to add the fudge layer without mixing everything up.
-
Add Hot Fudge Sauce: After the ice cream has set, take the warmed hot fudge sauce and gently pour it over the frozen ice cream layer. Use a spatula to spread it evenly, ensuring it covers the ice cream completely.
-
Freeze Again: Once the fudge sauce is spread out, return the pan to the freezer for another hour to let the fudge set.
-
Top with Whipped Topping: Remove the pan from the freezer and take the thawed whipped topping. Spread it over the fudge layer smoothly. This creates a beautiful final layer that adds creaminess.
-
Sprinkle Reserved Oreo Crumbs: Take the reserved ½ cup of crushed Oreos and sprinkle them over the top of the whipped layer. This adds a delicious crunch and looks great!
-
Final Freeze: Put the dessert back into the freezer and let it freeze for an additional 2 hours or until fully set.
-
Serve: Once set, let the cake sit at room temperature for about 10–15 minutes before slicing. This will help with cutting through the layers easily. Enjoy your delicious No-Bake Oreo Ice Cream Cake!
How to Serve No-Bake Oreo Ice Cream Cake
Serving your No-Bake Oreo Ice Cream Cake can be as simple or as fancy as you want. Here are some ideas to make serving easier and more enjoyable:
-
Slicing: Use a sharp knife to cut the cake into squares or rectangles. It’s best to dip the knife in warm water before slicing to help give you clean cuts.
-
Plating: Place each slice on individual plates. You can add a drizzle of hot fudge over each piece for an extra indulgent touch.
-
Garnishing: Consider adding a dollop of whipped topping on the side or a sprinkle of mini Oreos to make the plate more appealing.
-
Serving with Extras: You might serve your cake with a scoop of vanilla or chocolate ice cream on the side for those who want even more ice cream goodness.
Remember to enjoy it on a hot day or as a sweet treat at any celebration!
How to Store No-Bake Oreo Ice Cream Cake
Storing your No-Bake Oreo Ice Cream Cake properly ensures that it stays delicious and fresh. Here are some tips on how to store it:
-
In the Freezer: Since this is an ice cream cake, the best way to store it is in the freezer. Make sure it is well covered to avoid frost or freezer burn. You can use plastic wrap or aluminum foil to cover the pan tightly.
-
Slice and Store: If you have leftovers after serving, you can slice the cake into individual portions and store them in airtight containers. This makes it easy to enjoy later.
-
Duration: The cake can last in the freezer for up to 2–4 weeks. However, for the best flavor and texture, it’s recommended to enjoy it within the first two weeks.
-
Thawing: When you are ready to serve leftover cake, remove it from the freezer and let it sit at room temperature for 10–15 minutes before serving.
Tips to Make No-Bake Oreo Ice Cream Cake
-
Choose High-Quality Ingredients: Using high-quality Oreos, ice cream, and toppings can significantly enhance the flavors of your cake. Always aim for good brands for the best taste.
-
Experiment with Flavors: While cookies and cream is a classic, don’t hesitate to swap the ice cream flavor. Try chocolate, vanilla, or any other favorite flavors for a unique twist.
-
Keep It Simple: This dessert is meant to be easy. Don’t complicate it with overly intricate layers or toppings unless you want to experiment.
-
Mind the Freezing Times: Be patient and ensure that each layer is fully frozen before adding the next. This will help keep the layers distinct and neat.
-
Use Fresh Ingredients: Make sure your cream, fudge, and ice cream are fresh and not close to expiring. This will impact the overall taste of the cake.
Variation
The beauty of No-Bake Oreo Ice Cream Cake lies in its versatility. Here are a few variations you could try:
-
Flavor Swaps: Change the cookies and cream ice cream for flavors like mint chocolate chip or cookie dough. This change can give a different feel and taste to the cake.
-
Add Fruit: You could layer in some crushed or chopped fresh strawberries or bananas between the layers for a fruity twist.
-
Change the Crust: Instead of using Oreos for the crust, you could use graham crackers or other chocolate sandwich cookies.
-
Add Nutty Crunch: Incorporate crushed nuts or chocolate chips into the Oreo mixture for an extra texture boost.
-
Ice Cream Flavors: Layer different flavors of ice creams together, alternating between each layer, to create a multi-flavored cake.
FAQs
1. Can I make this cake in advance?
Yes! You can prepare this No-Bake Oreo Ice Cream Cake a day or two ahead of time. Just keep it stored in the freezer until you are ready to serve it.
2. What if I don’t like fudge sauce?
If fudge sauce is not to your taste, you can replace it with caramel sauce or even fruit syrups for a different flavor profile.
3. Can I use a different type of whipped topping?
Absolutely! You can use homemade whipped cream or a non-dairy whipped topping if you prefer. Just make sure it is thawed before spreading it on the cake.
4. Is there a way to make this cake healthier?
You can opt for reduced-fat Oreos and light ice cream, and you may also use a sugar-free whipped topping to make it a bit lighter.
5. What can I substitute for Oreos if I have allergies?
You can use gluten-free chocolate cookies or sandwich cookies as a substitute if you’re dealing with gluten allergies. Just ensure they are safe according to your dietary needs.
Crafting your No-Bake Oreo Ice Cream Cake is not only satisfying but also a delightful way to bring joy to your table. With simple ingredients and easy-to-follow steps, you can create a fun and delicious dessert that everyone will love! Enjoy making it and even more, enjoy eating it!
PrintNo-Bake Oreo Ice Cream Cake

A delightful no-bake dessert combining cookies and cream ice cream with a crunchy Oreo crust, topped with fudge sauce and whipped topping.
- Prep Time: 15 minutes
- Cook Time: 0 minutes
- Total Time: 325 minutes
- Yield: 12 servings 1x
- Category: Dessert
- Method: No-Bake
- Cuisine: American
- Diet: Vegetarian
Ingredients
- 1 package Oreos – crushed (reserve ½ cup for topping)
- ¼ cup unsalted butter – melted
- ½ gallon cookies and cream ice cream – softened
- 1 (16 oz) jar hot fudge sauce – warmed
- 1 (8 oz) carton whipped topping – thawed
Instructions
- Prepare the Oreo Crust: Crush Oreos into fine crumbs, reserving ½ cup. Mix remaining crumbs with melted butter.
- Press into the Pan: Grease a 9×13-inch baking pan and firmly press the Oreo mixture into the bottom.
- Spread the Ice Cream: Spread the softened cookies and cream ice cream evenly over the crust.
- Freeze: Place the pan in the freezer for about 120 minutes to set the ice cream.
- Add Hot Fudge Sauce: Pour warmed hot fudge sauce over the set ice cream and spread evenly.
- Freeze Again: Return the pan to the freezer for 60 minutes to let the fudge layer set.
- Top with Whipped Topping: Spread the thawed whipped topping over the fudge layer.
- Sprinkle Reserved Oreo Crumbs: Sprinkle reserved Oreo crumbs over the whipped topping.
- Final Freeze: Freeze for an additional 120 minutes or until fully set.
- Serve: Let sit at room temperature for 10–15 minutes before slicing. Enjoy!
Notes
Using high-quality ingredients can enhance the flavors of your cake. Feel free to experiment with different ice cream flavors or toppings.
Nutrition
- Serving Size: 1 slice
- Calories: 450
- Sugar: 35g
- Sodium: 300mg
- Fat: 25g
- Saturated Fat: 12g
- Unsaturated Fat: 9g
- Trans Fat: 0g
- Carbohydrates: 55g
- Fiber: 2g
- Protein: 6g
- Cholesterol: 30mg